In my last article I discussed, in probably too much depth, the technical aspects of depth of field. But I try to keep this series focused more on artistic issues and creativity. Let me take a different look at depth of field again as a concept.
Purely technical
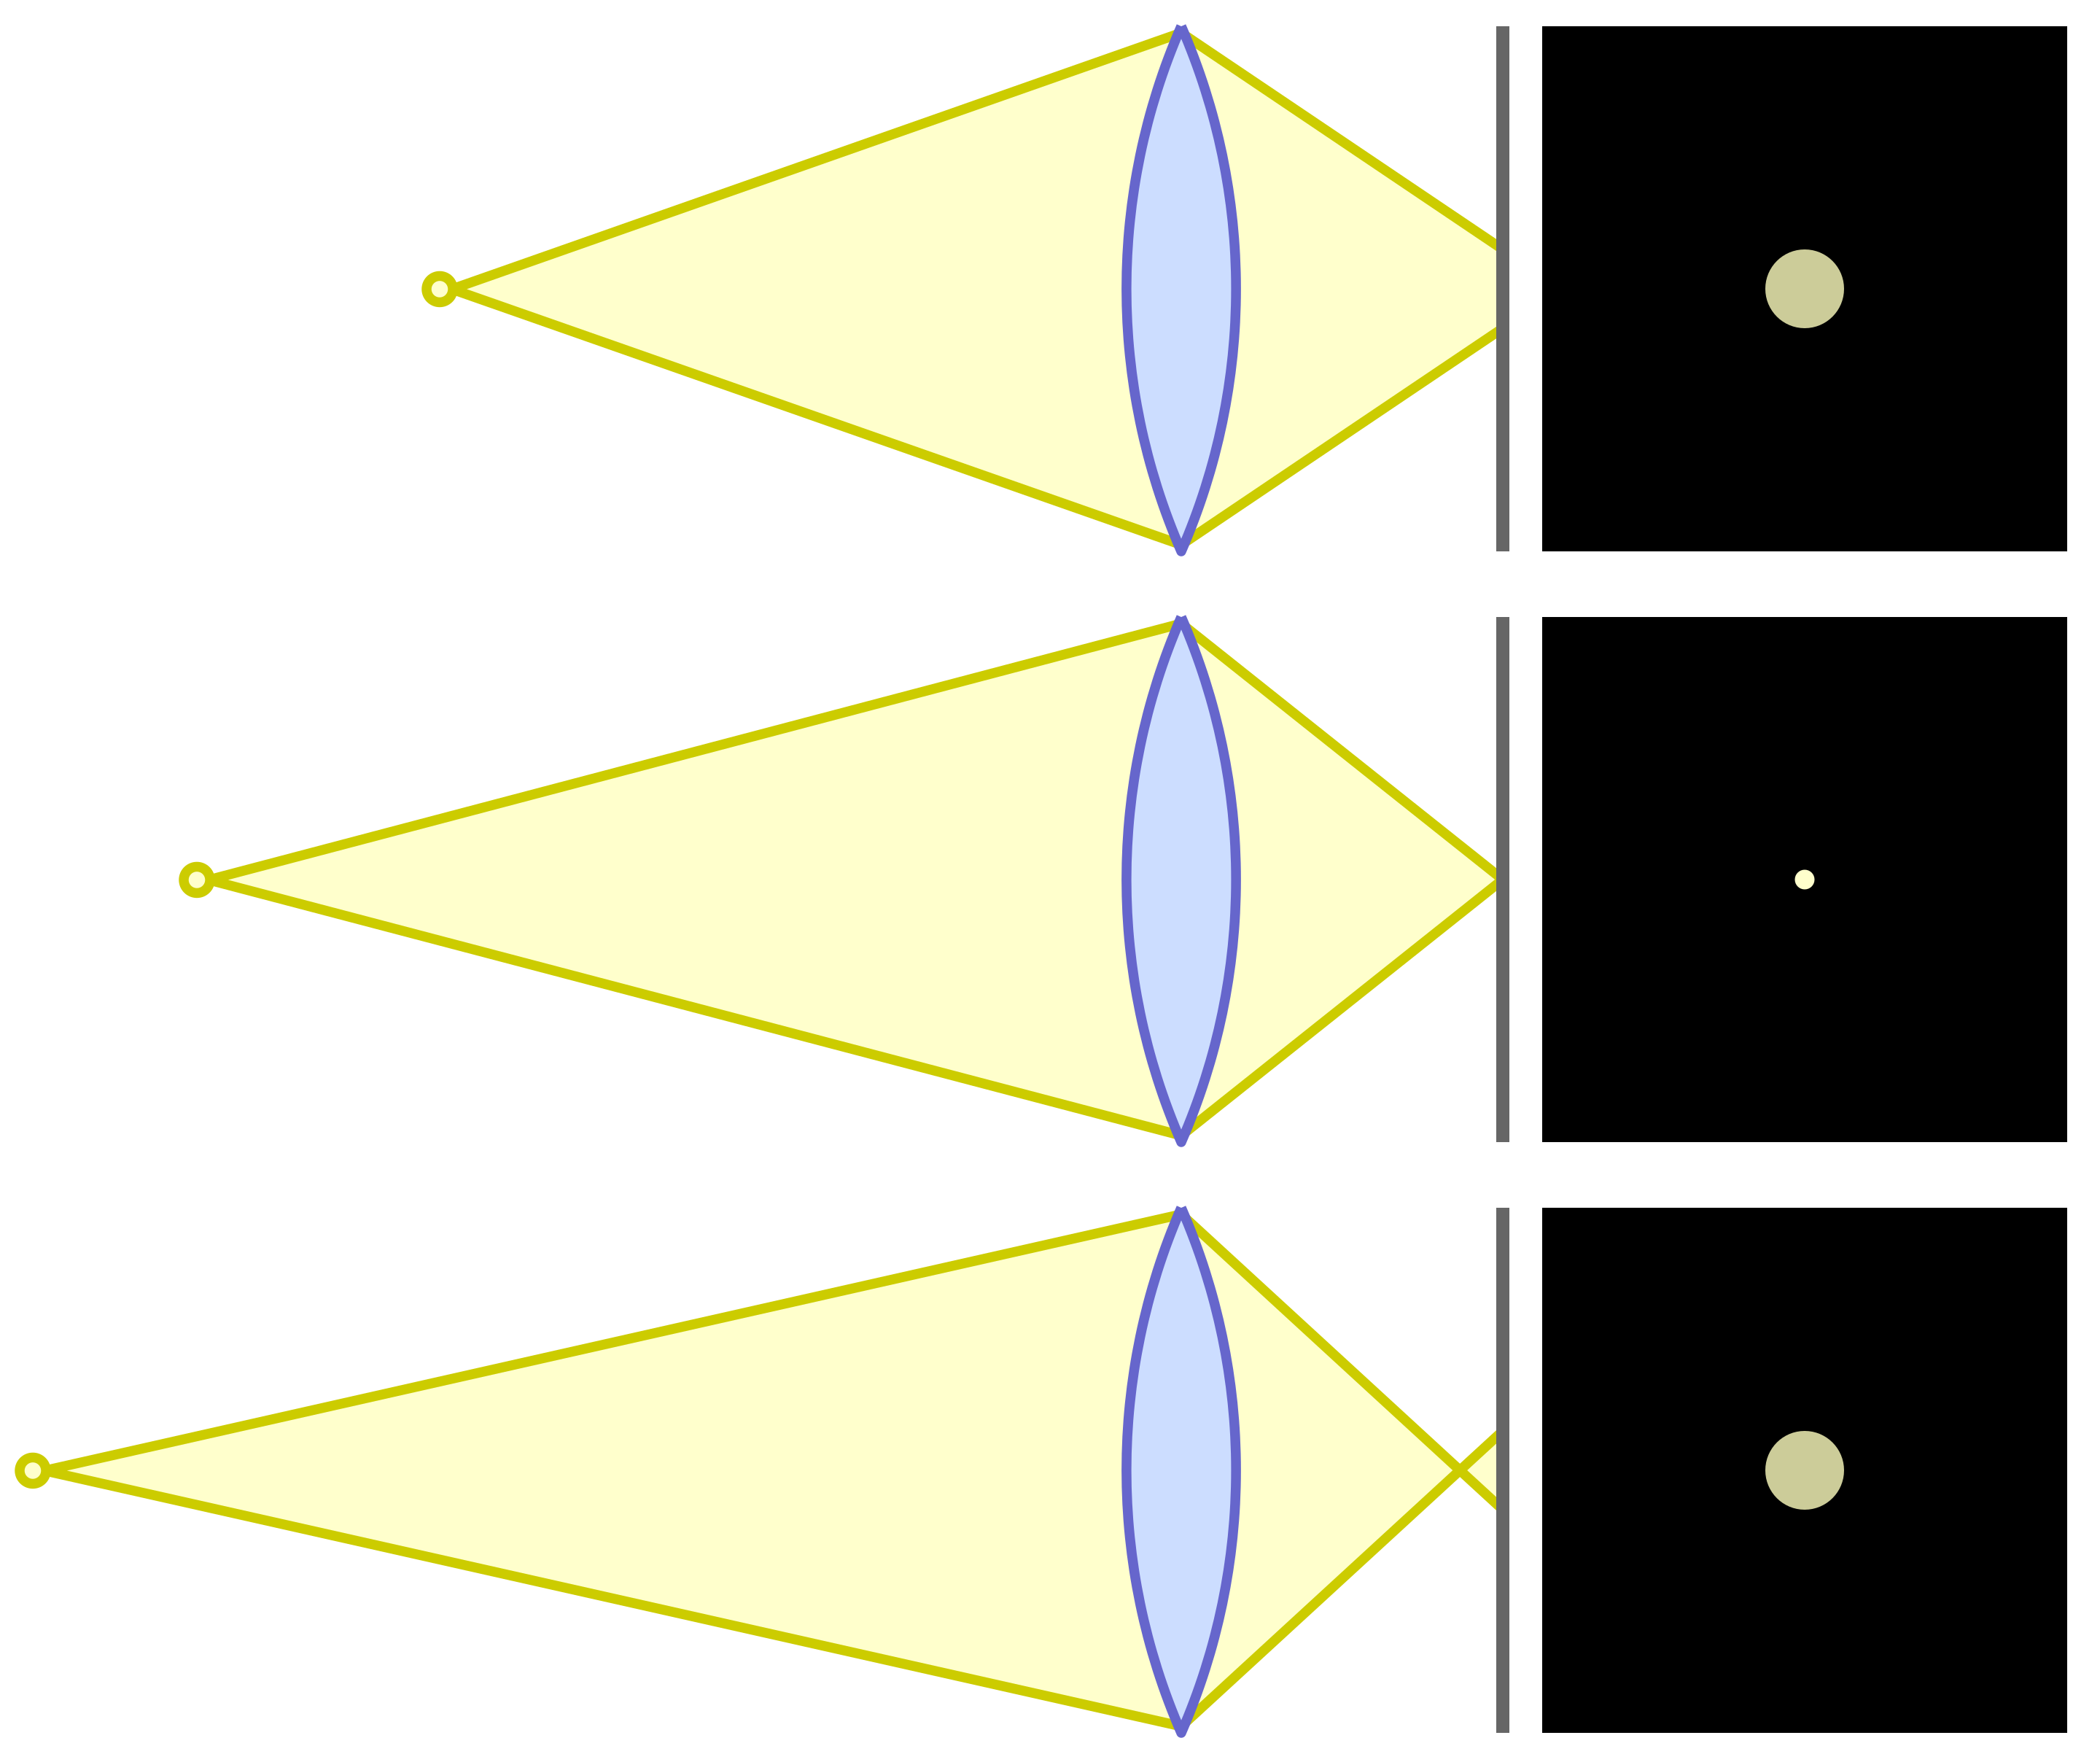
On the surface, depth of field is purely a technical concept. I went into some of the issues in my last article. Sorry for the math. 🙂 I know most people don’t like that. Actually, I don’t like it much either, but some level of understanding is necessary for mastery of the art.
Maybe the most challenging concept from that article was “circle of confusion”. The idea that there are acceptable levels of unsharpness. Perhaps there are analogies in our understanding of what we shoot.
Looking deeper
Let’s set the math and technical details aside for now. I can hear the sigh of relief.
I propose that there is an analogous concept concerning the sharpness of our intent when we are shooting. That is, did I just point my camera at a subject, make a decent composition, and shoot? Or was I clear in my mind why I was taking the picture and what it was really about?
I have often referenced the Ansel Adams quote that “There’s nothing worse than a sharp image of a fuzzy concept.” There are 2 reasons for that. First, it is a brilliant observation. Second, it is something I struggle with, so it is very real and close to me.
Yes, I can compose and I can use good technique to get the sharpness I want. I can use light to my advantage and I have a lot of experience post processing. But even so, I often look at my images in despair. Too often they are sharp images of a fuzzy concept. When I am honest with myself, I know I didn’t have much in mind when I shot them.
Art happens in our head
Maybe it is too obvious to state, but art happens in our head, not in the camera or the computer. As with any definite statement about art, this is a generalization. Sure, there have been many times when I was working with images on my computer and experimenting (e.g. playing) and things seemed to come together. That is the exception, though.
All too often I look at my images and realize they are, at best, just record shots of a place I was at. No “depth of focus”. Not much below the surface to give you a reason to pause over it and consider it.
The fault is entirely my own. I didn’t have anything to say, and I said it.
There is a marked contrast with the images I get when I go out to shoot a project, or ones I shot when I was feeling strongly about the subject or the situation. Many more of them are strong and satisfying.
We all know this: the more we put into something the more we are likely to get out of it. Why don’t I remember it more when I am out shooting?
My excuse, other than simply laziness, is that I like to go out exploring and shoot interesting things I come across. I don’t always find interesting or “deep” things. That is just that, an excuse. Maybe it is as much that I didn’t have much to say that day. I try to remind myself of Jay Maisel‘s quote that “If you talk with nothing to say, that’s bad. When you shoot with nothing to say, that’s worse.”
Circle of confusion
So, is there a “circle of confusion” concept for our shooting? Maybe so. If we can’t get our ideas into focus, maybe we shouldn’t shoot. Do our ideas have to be in perfect focus? No. Like the technical term, maybe there is an acceptable level of unsharpness. I hope so.
What do I mean by this? Well, sometimes I realize exactly what the scene means to me and I can determine exactly how to shoot it. That is great. I am often happy with the result. Sometimes, though, I just have a feeling, a sense of what I am experiencing. I have learned to follow those instincts even if I cannot clearly express their meaning at the moment. If something is drawing me, there is probably a reason.
Later, while editing, I may realize what was calling me to it. If I was diligent enough to work the scene a bit to get several views and takes , I might be lucky to find that one of them captures what I was feeling.
Maybe I am being too hard on myself. Jay Maisel also said “You always end up with too many pictures to edit and too few that you feel ‘got it’.” I suppose the feeling is common to all photographers, but it still is frustrating.
Projects to focus
I am learning to use projects to help me focus more clearly. A project is a chance to think deeply about something, decide how I feel about it, and then find opportunities to express it.
It is basic psychology that when you are concentrating on something you are more attune to it. A simple example: a friend was thinking about buying a Nissan car. I don’t think about there being many of them around, but after that conversation it seemed like every other car I saw was a Nissan. I was more attuned to them.
A somewhat more relevant example is from a recent trip to France. It was a family trip and we were going to be traveling around quite a bit but I didn’t want to come back with just random tourist shots. So I created a few projects to keep in mind to focus my thoughts and energy. One of them I called Sacred Places. It helped me be much more aware of cathedrals, of course, but monuments and memorials and standing stones. Even a small village celebration of their liberation in WWII. I felt more aligned with the concept of the project, it helped me to see more opportunities, and I felt I looked deeper at the occasions I found.
If I don’t see it, why should you?
Circling back to Jay Maisel’s quote: “If you talk with nothing to say, that’s bad. When you shoot with nothing to say, that’s worse.” If we can’t focus our feelings and experience, are we shooting with nothing to say? Just taking a sharp or well composed picture isn’t enough. If you can’t participate in the experience I felt then I’m not bringing you anything other than an “I was there” picture. Maybe it is pretty, but there isn’t much to feel or remember.
Perhaps I do not have to be able to precisely express what I was feeling at the moment. Maybe there is a “circle of confusion” associated with our understanding of the image we are creating that gives us some margin for imprecision. But the circle of confusion in focusing helps discuss a range of acceptable sharpness, not permission to be out of focus. Maybe there is a range of acceptable understanding of our feelings leading to making an image. But little or no understanding is definitely out of range. With no real understanding or feeling, there is little interest for viewers. Have something to say.
Today’s image
I mentioned having Sacred Places in mind and encountering a memorial celebration in a small village in France. This image was a result of that. We happened, by accident, to be there on the day of their annual celebration of liberation in WWII. They still remember and memorialize it to this day. That in itself is heart warming.
This flag display was presented while local dignitaries and military officials made speeches. I didn’t understand enough French to follow it, but it was moving.
Having the Sacred Placed project in mind made me more attuned to this. We actually stayed for all of it and loved being there. When they discovered that we were Americans I barely avoided having to give a speech at their village celebration afterward.
I hope a little of the dignity and solemnity of their memorial comes through.