This is a controversial subject. I have touched on it before, but it is time to circle back. My assertion is that most of us should throw away more of our work. Horrors! Kill our darlings? Sounds terrible! But I am convinced that one excellent way to improve our work is to throw it away.
We probably overshoot
It is so easy now days with digital cameras. There seems to be no cost for shooting a lot of frames. We “work the scene”, taking many shots at different angles and positions and focal lengths. Refining it to find the best view. And then shoot a few insurance shots, you know, in case one doesn’t record properly or we jiggle the camera. You know.
That’s a pretty typical process and can be useful. But the reality is these shots are not free. We have to edit them, cull through them to select the best, do some “quick” processing to see if they seem worth investing more in. This takes a lot of time. They take up disk and backup storage space.
So where with film, we might have taken 3 or 4 images of a scene, now we come back with 15 or 20 or more. That can be good. If you really have to work through different views to determine what is best, then do it. Or increased experience might help to get you there in fewer attempts.
For example, you come to a nice waterfall. So you shoot brackets of apertures from f/ 2.8 to f/22, and brackets of shutter speeds from 1/1000th to 10 sec, and exposures from -3 to +2 stops. Just in case. Why? You should know from experience what you prefer. You should know that f/8 +/- a little is what you like with this lens at this distance. The amount of blurring you prefer is usually achieved at around 1/4 to 1/10 second for this kind of subject. You should know how to expose to the right and prevent clipping of highlights.
Just that takes it from shooting all possible combinations to intelligently determining what to do. You have a style and preference and you should be comfortable with the craft. Why shoot things you know you won’t like?
Overshooting creates a huge backlog of work. And lots of wasted disk space. And a cluttered Lightroom catalog. Simplify.
We keep too much
OK, let’s say you intentionally shoot a lot of images of a scene as you work it. How much of that do you really need to keep?
Are you going to keep all the shots in case you later change your mind later about what you like? Don’t. Make an artistic decision and stick with it. Don’t keep that full bracket of apertures “just in case” you change your mind.
We make it hard on ourselves by second guessing our decisions. Decide what you like in the group, what matches your intent at the time, and throw away most of the others. My experience is that if I didn’t know what I liked at the time, one of the variations seldom captures “it” either.
The great gets lost in the sea of good
Are you drowning in a sea of pictures? So much that you can’t locate the shots you like best? I get the impression that this is an increasing problem for a lot of people.
A solution is a more disciplined filing and catalog system. This is made much easier when there are fewer images competing for our attentions.
You don’t need 20 decent pictures of that scene. You need the one that represents your best artistic sensibility at the time. And that one should be processed to bring out your vision as you saw it then. It should never be a case of wading through many competing images to pick out the best one.
Here is a hard lesson I have had to learn: good images are usually worthless. Only great images have any chance of making it. You seldom need the ones that are only good.
Declutter
I am arguing for decluttering our catalog by removing images you aren’t going to need. But yes, that means you have to kill some of your darlings. Delete perfectly good images.
This hurts. Why should you delete good images? Because as I said earlier, we are artists. We have to have the confidence to make a decision and a statement. This is my vision of that scene. None of the other attempts matter. DaVinci didn’t paint 20 variations of the Mona Lisa.
If you have a catalog of 100,000 images, are they 100,000 excellent images? What good are all those OK images that you will never use? Wouldn’t it be much better to only have 10,000 great images? The numbers are just for discussion. My point is, declutter your environment.
But, we say, I need insurance shots in case my great image gets corrupted. Really? How often does this happen. And if it does, that is what your backup strategy is there to correct.
But I really like all those shots. Yes, but when is the last time you used one of them? Why would you use one of them? If they are not the great image you love, their value is close to zero.
To use the example from before, if you have 100,000 pretty good images, how do you locate that 1 great one you want to submit to a gallery? It is hard to find the signal in the noise.
Declutter. It hurts at first, but is healthy.
Tighten up that portfolio
The same applies to our portfolios and projects. Less is usually more. This is another of those painful lessons experience teaches if we listen.
Your portfolio should have a max size you pick. If you want to add a new image to a portfolio, make yourself decide which one you will replace. This is hard. But here is a truth: every time you take one out, you make the remaining set stronger. Taking out a picture you love doesn’t mean you don’t love it anymore. It just means that it is not the strongest in the group.
I don’t think I have ever damaged a portfolio by taking something out.
Same with projects. That is a little trickier, because sometimes we need images to set a context or help tell our story, but still, they should all be strong. Less is still usually more.
A personal example. I recently needed to pull together a group of images for an exhibit. The subject was one I love, so I had a lot of images I really liked. In my first pass, I pulled out 162 images I loved that I thought would be great for it. I knew that was a ridiculous number for this exhibit, but I really liked all of them.
So hard core culling mode on. After my next pass, it was down to 125. Progress, but way out of range still. I had to remind myself that deleting an image from the set doesn’t mean I don’t like it, just that it was bumped by a stronger image of mine. So with a great struggle, I was down to 69. So far I have taken out nearly 100 of my favorite images!
Narrowing my focus and getting even more selective got it down to 44. It hurt, but now I have narrowed it to 23. I’m kind of stuck right now, but I know I need to get it down to about 15.
A funny thing has happened, though. At this point I believe ALL of them are great images and I could almost randomly select the next 8 to cut. That is an interesting realization.
Be reasonable
In all things you have to make reasonable judgments for yourself. I’m not saying never keep alternate shots of a scene. I routinely keep a few. But I don’t keep duplicates that do not add any value. And I don’t keep alternate images that I know from experience are not my style.
And there are those shots you know are flawed, but you just love them. Fine. I have a lot of those. Generally they are segregated from my “main” images, but they are important memories for me. Or they tell a behind the scenes story that is valuable to me.
I use a multi-pass editing process and I usually let images age some before making many final judgments about them. But I figure if I don’t delete about 1/2 of my shots, either I am on a great run (it happens sometimes) or I’m not being critical enough. Often it runs to 2/3 deleted. And by deleted, I mean really gone, erased, trashed, removed, never to be seen again, digital dust.
It hurts, but the remaining ones are stronger. I want to always be biased toward making the survivors stronger.
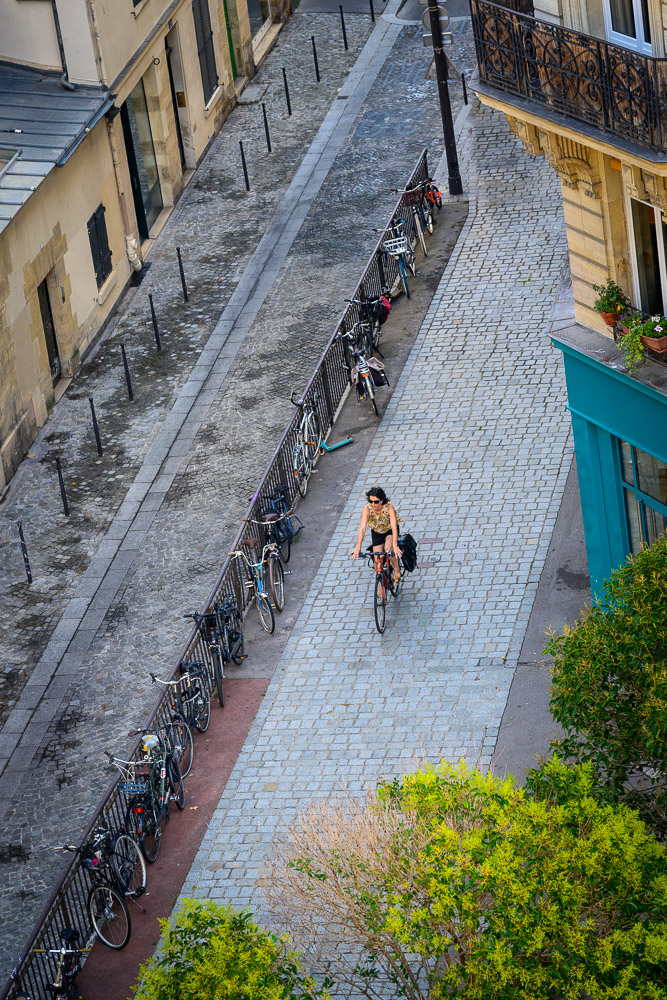
Today’s image
The project I described above is on France. More about the joie de vivre rather than a tourist view. To present more of a mirror than a window, to refer back to a recent post. This picture is one i am struggling with. Would you keep it? So far I have. I think it says a lot about the environment and culture and spirit of the people. I love it for a number of reasons. If it doesn’t make it into the final set, I will be disappointed, but it means the overall group has a higher bar.