I advocate it, but I’m not talking about a romantic meeting. Making art should be an act of love. We should fall in love with our works, or else, why do them?
Because it’s there
I mostly wander and explore without a lot of planning or result in mind. Sometimes I shoot pictures just because something is kind of interesting and I’m there to see it. That can be good, but usually not.
Being an explorer, I follow my curiosity. I tend to try a lot of experiments to see what happens. So if something tweaks my interest I often see what I can do with it. Occasionally I have a tingle and excitement when I press the shutter, knowing that I have captured something I love. Sometimes it doesn’t happen until I am reviewing the image large on my computer. Then I discover that it is far more interesting than I thought at the time I took it. Both are joyous occurrences.
More often than not, I find I have well composed, well exposed pictures of – nothing much. I look at them later and say “yeah, it was an interesting scene and it’s an OK picture, but it doesn’t grab me.” Usually I think it is because I did not feel strongly about the subject or scene. I didn’t fall in love with it.
If I don’t feel passion for the image, how can I expect you to when you view it? It is pretty obvious to me which ones really grab me. I think you can perceive it, too.
Over-planning
At the opposite end I see some photographers occasionally get trapped by over planning. Conventional wisdom from many renowned photographers is that any photo trip or outing should be planned out in great detail. They will research a location extensively, looking at pictures from other photographers to try to find the “best” places and positions and angles and times and seasons. In addition, they will use tools like The Photographer’s Ephemeris to select the exact time and day and location to get the exact sunrise/sunset/moonrise/ etc. shot they want. And they may book an outing with a workshop or guide to help with the logistics and transportation.
Is there anything wrong with doing it this way? Absolutely not, if that is the way you work. Different personality types need to approach things in different ways. Do what works for you, but don’t get into a mental trap.
One of the traps I see is that we tend to get so invested in the preparation for the shot that we have to take it. We spent a lot of time and money to get to that point. It becomes a quest. It has artificially become so important that we have to take the pictures to validate and justify the trip.
But what happens when you get there and the weather is “bad”? Bad being not what you planned for. Maybe you don’t like the workshop leader or structure. Worst, what do you do when you get there after all the planning and expense, look at the scene, and feel “meh”?
Of course you take the pictures. You have to. But if you’re honest, they may not make your portfolio set you are excited to show people. There was just no life there. You can check off that you got the iconic shot, but maybe it ends up not being very important.
Having our expectations too high can lead to disappointment.
Anti-planning?
You can guess from what I’ve written that detailed planning is not for me. I am almost an anti-planner. I tend to come at things the opposite way. Going to iconic locations and fighting for a tripod location and taking the exact same image 10,000 other photographers have taken just in the last month is not a motivation for me.
Yes, the scene is beautiful. Yes, it is probably salable because it is the type of image people like to have on their wall. Economically it is foolish to not get this image and pander to the crowd.
But for me, even though I think the scene is beautiful, I probably will not feel great passion for it. How can I distinguish myself from the thousands of other photographers shooting the same things? How can I tell my story or share my feelings?
In love
Back to the original statement of this article, I believe I have to fall in love with my images. If I am going to show you something I have made, it has to be much more than good. It has to have a passion you can sense. How can I bring you art you want unless I feel strongly about it?
Thoreau said “A man has not seen a thing who has not felt it.” The famous photographer John Sexton said “Too often we attempt to force a photograph out of a situation rather than allow the situation to speak to us.”
I am guilty at times of trying to force images to be there when I’m not actually listening and feeling. I recognize it. It is painfully obvious when I am reviewing them in Lightroom that I have a bunch of well executed pictures that mean nothing to me. Trashing them is the best thing to do. And use it as a reminder to follow the passion more than the light. If I don’t have a sense of wonder and passion for the image that is a good sign that it probably didn’t work.
“Follow your passion” is not always good advice in life – you have to do a lot of things you don’t like. But in art it is great advice. It may not be the clear path to fame and fortune, but you will feel good about what you create. And your viewers can tell. Love your work.
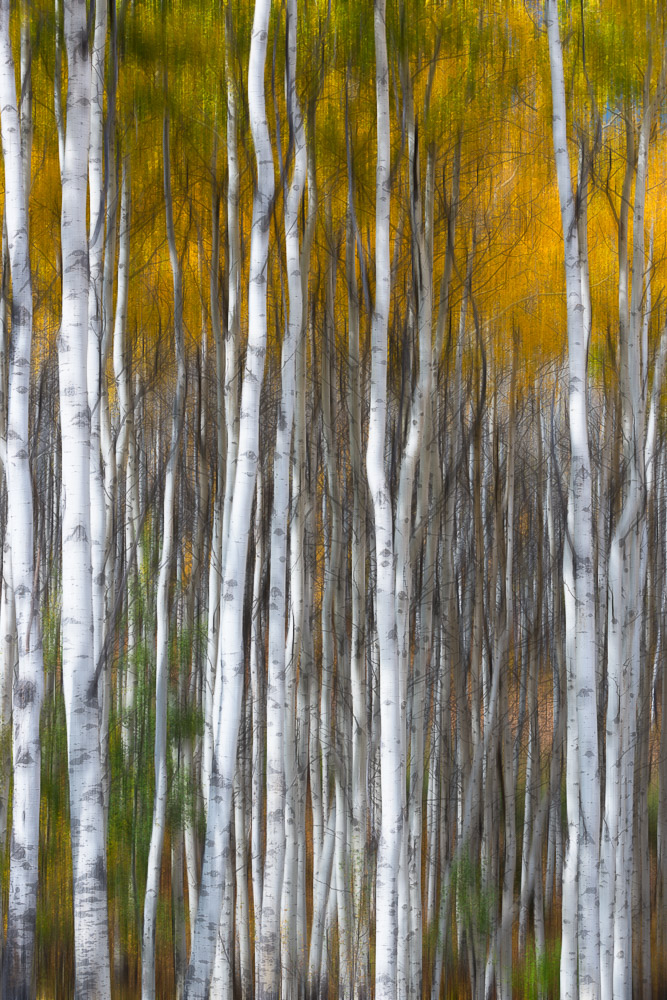
This example
I have used this image at the top before. It is a good illustration of my point here, though.
I love this image. I could stare at it for a long time. It speaks to me at a level I can’t even describe. The rich color, the organic flow, the streaks of movement over time, the standing wave shapes, the minimalist simplicity all move me.
This as shown here is almost straight out of the camera. It is what I shot. Yes, it has been cropped square and had some minor tone corrections, but this is what I discovered and jumped on. The color and the time effects of the flow are as shot. I liked it as seen through the viewfinder. I loved it after I saw it large on the computer.
It is one of the few pictures I have hanging on my wall at home.