An artists journey

Tag: photographic sensors

  • Black & White – in Color

    Black & White – in Color

    What? Isn’t that contradictory? Isn’t black & white is about the absence of color? I wanted to follow up on a previous article on how we get color information in our digital cameras with a nod to the purity of black and white and emphasize how it is still dependent on color.

    Remove the color filter?

    I indicated before that our sensors are panchromatic – they respond to the full range of visible light. If we want black & white images, shouldn’t we just take the color filter array off and let each photo site respond to just the grey values?

    We could, but most black & white photographers would not be happy with the results. It would be like shooting black & white film. A problem with black and white film is that it eliminates all the information that comes from color. Through interpolation of the Bayer data, we get full data for red, green and blue at each pixel position. If we removed the filter array, we would have only luminosity data. So before even starting, we would be throwing away 2/3 of the data available in our image.

    At that point we would have to resort to placing colored filters over the lens, like black & white shooters of old had to do. They did this to “push” the tonal separation in certain directions for the results they wanted. But this filter is global. It affects the whole image rather than being able to do it selectively as we can with digital processing. And it is an irreversible decision we would have to make while we were shooting. Why go backward?

    What makes a good b&w image?

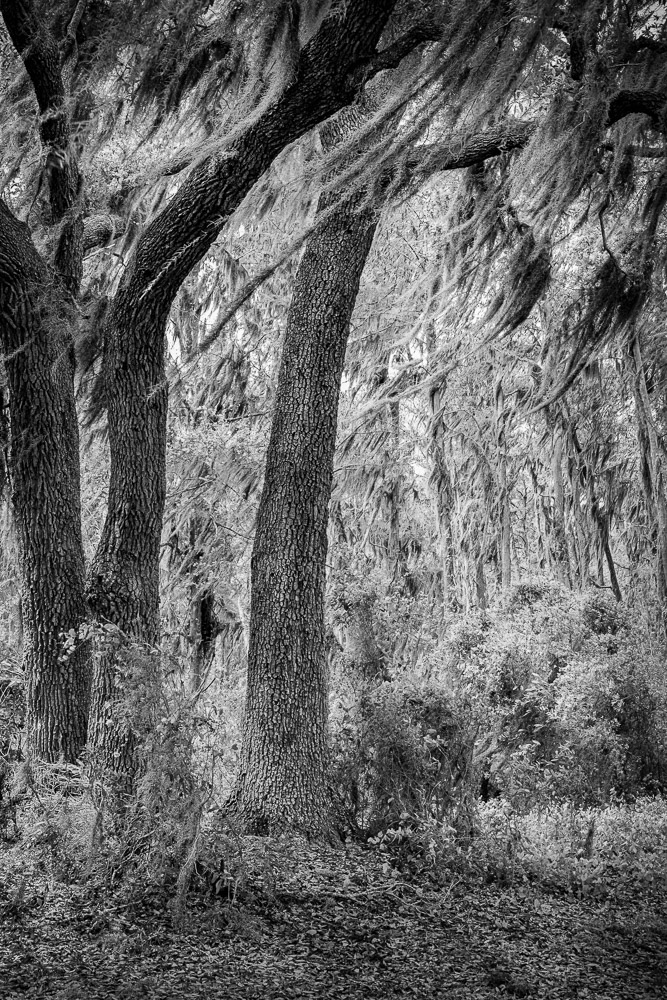
    Black & white images are a very large and important sub-genre of photography. The styles and results cover a huge range. But I will generalize and say that typically the artists want to achieve a full range of black to white tones in each image with good separation. Think Ansel Adams prints.

    Tones refer to the shades of grey in the resulting print. We do a lot of work to selectively control how these tones relate to each other. Typically we want rich black with a little detail preserved in them, bright whites, also containing a little detail, and a full range of distinct tones in between. These mid-range tones give us all the detail and shading.

    Tone separation

    If one of the goals of black & white photographers is to have high control of the tones, how do we do that? Typically by using the color information. I mentioned putting colored filters over the lens. This was the “way back” solution.

    Landscape photographers like Ansel Adams often used a dark red filter to help get the deep toned skies they were known for. Red blocks blue light, forcing all the blue tones toward black.

    Digital processing gives us far more control and selectivity than the film photographers had. We don’t have to put the filter over the whole lens and try to envision what the result will be. We can wait and do it on our computer where we have more control, immediate previews, and undo. But all this control would be impossible without having a full color image to work with. As a matter of fact, modern b&w processing starts by working on the color image. Initial tone and range corrections are done in color. Good color makes good b&w.

    B&W conversion

    Obviously, at some point the color image has to be “mapped” to b&w. This is called b&w conversion. It can be a complicated process. There are many ways to go about the conversion, and each artist has their own favorites. There is no one size fits all.

    It is possible to just desaturate the image. This uses a fairly dumb algorithm to just remove the color. It is fast and easy, but it is usually about the worst way to make a good b&w image.

    You could use the channels as a source of the conversion. The RGB colors are composed of red, green and blue channels. These can be viewed and manipulated directly in Photoshop. They can often be useful for isolating certain colors to work on. Isolating the red channel would be like putting a strong red filter over the lens.

    Lightroom and Photoshop have built in b&w conversion tools. In LIghtroom, choose the Black & White treatment in the Basic panel of the Develop module. This has an interesting optional set of “treatments” to choose from in the grid control right under it. In Photoshop use the B&W adjustment layer.

    Both of these have the power of allowing color-selective adjustments. This is huge. Tonal relationships can be controlled to a much greater degree than was possible with film. If we want to just make what were the yellow colors brighter, we can do that. Of course, Photoshop allows using multiple layers with masking to exert even more control.

    There are many other techniques, such as channel mixing or gradient maps or plug-ins like Silver Effects to give different and added control. It is actually an embarrassment of riches. This is a great time to be a b&w photographer.

    It starts with color

    What is common to all of this, though, is that it starts from the color information. Color is key to making most great black & white images.

    I sometimes hear a photographer say “that image doesn’t work well in color, convert it to b&w”. Sometimes that works, but I believe it is a bad attitude. B&w is not a means of salvaging mediocre color images. We should select images with a rich spread of tones, great graphic forms, and good color information allowing pleasing tonal separation. Black & white is its own special medium. Remember, though, usually it requires color to work.

  • How We Get Color Images

    How We Get Color Images

    Have you ever considered that that great sensor in your camera only sees in black & white? How, then, do we get color images? It turns out that there is some very interesting and complicated Engineering involved behind the scenes. I will try to give an idea of it without getting too technical.

    Sensor

    I have discussed digital camera sensors before. They are marvelous, unbelievably complicated and sophisticated chips. But they are, still, a passive collector of photons (light) that falls on them.

    An individual imaging site is a small area that collects light and turns it into an electrical signal that can be read and stored. The sensor packs an unimaginable number of these sites into a chip. A “full frame” sensor has an imaging area of 24mm x 36mm, approximately 1 inch by 1.5 inch. My sensor divides that area into 47 million image sites, or pixels. It is called “full frame” because that was the historical size of a 35mm film frame.

    But, and this is what most of us miss, the sensor is color blind. It receives and records all frequencies in the visible range. In the film days it would be called panchromatic. That is just a fancy word to say it records in black & white all the tones we typically see across all the colors.

    This would be awesome if we only shot black & white. Most of us would reject that.

    Need to introduce selective color

    So to be able to give us color, the sensor needs to be able to selectively respond to the color ranges we perceive. This is typically Red, Green, and Blue, since these are “primary” colors that can be mixed to create the whole range.

    Several techniques have been proposed and tried. A commercially successful implementation is Sigma’s Foveon design. It basically stacks three sensor chips on top of each other. The layers are designed so that shorter wavelengths (blue) are absorbed by the top layer, medium wavelengths (green) are absorbed by the middle layer, and long wavelengths (red) are absorbed by the bottom layer. A very cleaver idea, but it is expensive to manufacture and has problems with noise.

    Perfect color separation could be achieved using three sensors with a large color filter over each. Unfortunately this requires a very complex and precise arrangement of mirrors or prisms to split the incoming light to the three sensors. In the process, it reduces the amount of light hitting each sensor, causing problems with image capture range and noise. It is also very difficult and expensive to manufacture and requires 3 full size sensors. Since the sensor is usually the most expensive component of a camera, this prices it out of competition.

    Other things have been tried, such as a spinning color wheel over the sensor. If the exposure is captured in sync with the wheel rotation then 3 images could be exposed in rapid sequence giving the 3 colors. Obviously this imposes a lot of limitations on photographers, since the rotation speed has to match the shutter speed. A real problem for very long or very short exposures or moving subjects.

    Bayer filter

    Thankfully, a practical solution was developed by Bryce Bayer of Kodak. It was patented in 1976, but the patent has expired and the design is freely used by almost all camera manufacturers.

    The brilliance of this was to enable color sensing with a single sensor by placing a color filter array (CFA) over the sensor to make each pixel site respond to only one color. You may have seen pictures of it. Here is a representation of the design:

    Bayer Filter Array, from Richard Butler, DPReview Mar 29, 2017

    The gray grid at the bottom represents the sensor. Each cell is a photo site. Directly over the sensor has been placed an array of colored filters. One filter above each photo site. Each filter is either red or green or blue. Note that there are twice as many green filters as either red or blue. This is important.

    But wait, we expect that each pixel in our image contains full RGB color information. With this filter array each pixel only sees one color. How does this work?

    It works through some brilliant Engineering with a bit of magic sprinkled in. Full color information for each pixel is constructed by interpolating based on the colors of surrounding pixels.

    Restore resolution

    Some sophisticated calculations have to be done to calculate the color information for each pixel. This makes each pixel end up with full RGB color values. The process is termed “demosaicking” in tech speak.

    I promised to keep it simple. Here is a very simple illustration. In the figure below, if we wanted to derive a value of green for the cell in the center, labeled 5, we could average the green values of the surrounding cells. So an estimate of the green value for cell red5 is (green2+green6+green8+green4)/4

    From Demosaicking: Color Filter Array Interpolation, IEEE Signal Processing Magazine, January 2005

    This is a very oversimplified description. If you want to get in a little deeper here is an article that talks about some of the considerations without getting too mathematical. Or this one is much deeper but has some good information.

    The real world is much more messy. Many special cases have to be accounted for. For instance, sharp edges have to be dealt with specially to avoid color fringing problems. Many other considerations such as balancing the colors complicate the algorithms. It is very sophisticated. The algorithms have been tweaked for over 40 years since Mr. Bayer invented the technique. They are generally very good now.

    Thank you, Mr. Bayer. It has proven to be a very useful solution to a difficult problem.

    All images interpolated

    I want to emphasize a point that basically ALL images are interpolated to reconstruct what we see as the simple RGB data for each pixel. And this interpolation is only one step in the very complicated data transformation pipeline that gets applied to our images “behind the scenes”. This should take away the argument of some of the extreme purists who say they will do nothing in post processing to “damage” the original pixels or to “create” new ones. There really are no original pixels.

    I understand your point of view. I used to embrace it, to an extent. But get over it. There is no such thing as “pure” data from your sensor, unless maybe you are using a Foveon-based camera. All images are already interpolated to “create” pixel data before you ever get a chance to even view them in your editor. In addition profiles and lens corrections and other transformations are applied,

    Digital imaging is an approximation, an interpretation of the scene the camera was pointed at. The technology has improved to the point that this approximation is quite good. Based on what we have learned, though, we should have a more lenient attitude about post processing the data as much as we feel we need to. It is just data. It is not an image until we say it is, and whatever the data is at that point defines the image.

    The image

    I chose the image at the head of this article to illustrate that the Bayer filter demosaicking and other image processing steps gives us very good results. The image is detailed and with smooth, well defined color variation and good saturation. And this is a 10 year old sensor and technology. Things are even better now. I am happy with our technology and see no reason to not use it to its fullest.

    Feedback?

    I felt a need to balance the more philosophical, artsy topics I have been publishing with something more grounded in technology. Especially as I have advocated that the craft is as important as the creativity. I am very curious to know if this is useful to you and interesting. Is my description too simplified? Please let me know. If it is useful, please refer your friends to it. I would love to feel that I am doing useful things for people. If you have trouble with the comment section you can email me at ed@schlotzcreate.com.

  • What’s the Noise?

    What’s the Noise?

    Noise in digital imaging. Is it a problem? Is it part of the art? Should you be concerned? Are there exotic techniques you need to learn to eliminate the noise?

    Fear

    Many of us have been taught to fear noise. So much so that I know people who would pass up a great shot because the image might be noisy. The fear of noise is an irrational, superstitious fear.

    This seems most common in the landscape photography community. Conventional wisdom, and the teaching of most instructors, says we should always shoot at the “native” ISO of the camera for lowest noise. That would be ISO 64 for my camera. If we don’t, we are increasing the noise in our images and that would be a “bad thing”.

    Have you ever examined the feared noise yourself? Do you understand what it is and what effect it has on prints? Have you confronted the monster and stared it down?

    Noise Technology

    The digital sensor is an amazing piece of technology. It has a HUGE grid of photo-receptive sites. My Z7 has nearly 46 million pixels. A strand of the smallest human hair would cover at least 14 of these pixels. No wonder I see dust spots!

    Did you know that “digital” imaging is actually an analog process? Each receptor “adds up” the number of photons it receives for a frame. This is a scalar value, an analog signal. Each site is read out to an amplifier and analog-to-digital converter where it is transformed into a digital value. The amplification is determined by the ISO setting – dialing in a greater sensitivity corresponds to more amplification. This amplification is one source of noise. Any time you take a very low level analog signal and amplify it, some noise is inescapable.

    But in addition, the sensor chip itself contributes noise. There is a phenomenon called “shot noise”. It is beyond my ability to explain simply, but electrons spontaneously generate noise. It is usually low level and it is temperature dependent. This is why your camera probably has a long exposure compensation mode. It is there to reduce this background noise accumulated over a long exposure. During a long exposure the sensor is powered for long enough to raise its temperature, leading to increased noise. The compensation mode takes another exposure, but with the shutter closed. This reads the background noise level with no light coming in. The camera basically subtracts the noise signal from the original image. It does a pretty good job.

    The amplifier and the sensor noise generation are 2 significant sources of noise in digital imaging. Not the only ones, but they are big. Keep in mind that most of the writers you will see do not have a significant technical background. They sometimes give bad advice because they do not really understand what is happeningl

    What does the dreaded noise look like?

    Take an image with the ISO cranked up pretty high, say 12,800. Look at it at 1-to-1 magnification in your editing software. You will see that it looks kind of like blotchy sandpaper. You are seeing the 2 primary types of digital noise: luminance noise and color noise.

    Luminance noise looks kind of like the grain we used to see in fast black and white film. Some people like it and it does add an interesting texture to some images. Color noise is the mottled color patches you may see at high magnification. I don’t know of anyone who likes that. Both of these types of noise can be compensated for significantly by your editing software, like Lightroom Classic.

    Let me point out that noise is just a part of the image capture. It is not something that, when they see it, the authorities kick you out of the gallery or revoke your artist’s certificate. You have an artist’s certificate, right? 🙂

    Noise Techniques

    Noise is part of the technology we deal with because we do digital imaging. We need to be aware of it and know how to deal with it, if it is a problem for us. I mentioned amplification noise and sensor noise.

    To minimize noise, keep the ISO low, keep the sensor cool, and minimize long exposures. Simple. But what if that doesn’t work?

    I will use me as an example. I often shoot in low light, sometimes hand held with no tripod. And I often use long exposures. Am I doomed?

    Here are the decisions I generally make: if I want the image to be free from blurring caused by shake, I up the ISO until the shutter speed is at about 3x the focal length. Yes, conventional wisdom is 2x, but I find that does not work well for very high resolution sensors, even with great image stabilization. If I want a long exposure for the creative effect, I use it. Noise is not a significant consideration most of the time. And, unconventionally, I usually leave the long exposure noise compensation off.

    Let me address that last one. Why would I leave the long exposure noise compensation off? The noise here is made worse by sensor heating. I shoot a lot in Colorado. Unless it is mid summer, the sensor stays pretty cool. As a matter of fact, it is often more of a problem keeping the battery warm enough to not shut off. And even in summer, it is not a problem to wait a few seconds between shots to let it cool. There have been a few times where I have gotten in trouble with this, but very few.

    So what?

    For me, noise is just a part of the creative balance. Sometimes I want to minimize it, sometimes I actually want to introduce it. Even for the vaunted landscapes, noise can introduce a welcome texture at times, maybe to give a grit for effect or to give subtle interest to a featureless sky.

    I do not fear noise. ISO 400 is my default setting – that is 3 stops over the camera native ISO. I do not mind going to 3200 or 6400 if I need to as a tradeoff to capture what I want.

    With my camera it is hard to discern noise at 400. There is not much to find at 1600. I admit, my old training to favor the lowest ISO sometimes interferes with my artistic judgment. I try to fight it.

    The image with this article was shot at ISO 6400, with what is, as of this writing, an 8 year old sensor. I’m not ashamed of the noise. It I didn’t shoot at 6400 I would not have gotten the image. Good tradeoff, to me.

    Noise is a traditional part of photography. It is a feature that sets it apart from painting. Black & White photography favored grain for a gritty look. Many artists like the effect. Even the ones who may not use it recognize and accept it as part of the medium. Digital noise is the equivalent.

    So don’t fear noise. Accept it. Use it where you can. Understand where it comes from and what control you have. Your editing tools have ways to reduce it, and they do a pretty good job. Luminence noise is not exactly the same thing as grain, but the overall effect is not that different. Perhaps always totally eliminating noise is not the goal. Did you ever see the slider in LIghtroom Classis in the Effects panel to increase grain? Play with it sometime. It may add to your artistic vision.

  • Obsessive Clicking Disorder*

    Obsessive Clicking Disorder*

    How many images do you click off of a scene? Why? Our wonderfully fast cameras have enabled this thing I have heard called “Obsessive Clicking Disorder”. When we see a scene that looks promising we can blast away at 5 or 10 or maybe 20 frames a second to “make sure” we get the shot.

    I claim that that is often self-defeating, even lazy.

    Machine gunning

    So we point our camera at the scene and machine gun it for 30 frames. We are afraid we might miss “the moment”. Machine gunning is a brute force technique.

    Think about the shooting metaphor. A rifle allows a skilled shooter to place a single clean hole right where he wants it. A machine gun sprays bullets all over the place in an uncontrolled way. The single rifle shot is elegant and controlled and disciplined. To me it is craftsmanship.

    Those of us shooting fairly static and predictable subjects can usually take the time to wait for the right moment and fire off just one or two or a few frames. And, of course, if you are taking long exposures you’re not going to be firing away at high speed. Less can be more.

    Bracketing

    Another time where lots of images are captured is bracketing. In certain situations this is completely appropriate. Our marvelous sensors have a great dynamic range, but sometimes scenes require more. Exposure bracketing might come to the rescue by allowing an HDR compression of the range.

    Do very many of your situations actually require this? I couldn’t put a percentage to my work. But I know it is only the occasional high contrast situation that forces me to use it. The extra work and the varied results of HDR processing make me try to avoid it where possible. And scenes with movement are often not good candidates.

    Be aware

    But what is the alternative to obsessive clicking? How can you get the shot of the fleeting moment?

    To me the answer is being aware and attuned to the action going on. If we train ourselves to anticipate the “decisive moment” and be ready for it, we can capture it and know we have it. A good DSLR is fast (10-20 mSec to trigger an image capture, maybe even faster if using electronic shutter). Compare that to machine gunning at 10 frames a second. That is one image every 100 mSec. But within the regular, unvarying 100 mSec ticks a person can move a few inches or blink. You are just hoping that the odds will work in your favor. And often they do.

    An alternative, though, is to focus on the moment, the gesture. You might be amazed at the ability you can learn to recognize and capture that peak time when the gesture and the eyes and everything is right. Triggering the shot then will usually get the scene you hoped for.

    Gesture

    The incredible Jay Maisel describes this as waiting for the gesture. That is his version of the decisive moment. When we get in the flow and are completely attuned to the subject we can usually anticipate when these great gestures will happen. Wait for it. If you are concentrating, you will have time to press the shutter and get it.

    “Such moments are fleeting, requiring more than fast autofocus and reflexes. It demands that the photographer be able to read a scene as it’s playing out. He or she had to understand that all moments evolve, having a beginning, middle, and end. With that understanding, the photographer can anticipate that peak moment where all the visual elements or light and shadow, line and shape, color and gesture culminate in a moment that can only be captured in a fraction of a second.” Ibarionex Perello

    I find this is a wonderful and rewarding skill to learn. It is precise and immersive. You become highly engaged in the scene and the action. You learn to grasp the whole gestalt while still triggering on that perfect instant. It is a great feeling.

    Have you experienced it? You know it’s coming. You are in the right place to view it. Almost, Wait for it. NOW! When you hit the shutter you know you have the shot. It’s a great feeling of accomplishment to know you captured exactly the gesture you were anticipating.

    There is a time

    Do I ever blast away at high speed? Well, actually no. I stopped doing that when I didn’t have any more family doing sports that I was shooting. I do use exposure bracketing at times. On occasion I even take exposure bracketed panoramas.

    I recognize that there are times when any of us will take lots of frames. I’m just trying to convince you that machine gunning is a sort of backup plan, not a primary strategy.

    As an example of where I would do it, I love taking images of reflections in water. This is a dynamic scene that never repeats. I may take a several frame sequence to capture variations of reflections so I can choose the one that works best for me. But by the argument I used before, this is not an attempt to capture a peak moment by brute force. I expect each frame to be an excellent image but hopefully one will speak to me as the best.

    Be disciplined

    At the root it is about being disciplined. Closing down our options and forcing ourselves to take one frame of the decisive moment is kind of like the exercise I recommended of going out with 1 lens. It requires us to practice and develop our skill and use our mental quickness rather than brute force.

    I believe mental discipline and the ability to make fast decisions is required for photography. Learning this skill will, I believe, help us make a higher percentages of images we are proud of.

    This is just my own value, but I have discovered that if I can help it, I really don’t want to spend the time editing through 500 shots only to throw 400 of them away. At some level it seems to me that I am shooting randomly and grasping at straws rather than being deliberate and disciplined about my work. Photography is an art and a craft. Training and experience and discipline will improve our art.

    Try it. Let me know who it goes after you practice a while.

    space

    *Yes, it is a pun on Obsessive Compulsive Disorder. I know that is a potentially debilitating disease that 1-3% of the population has. It is not something to make fun of and I am not doing that or denigrating anyone suffering from it. I am just using this well known phenomenon to make a point.

  • The Problem of Mega Pixels

    The Problem of Mega Pixels

    I love the capabilities of modern digital cameras, especially the wonderful sensors and great lenses available. But nothing is free, and I’m not just talking about the price of the gear. Having too many mega pixels can cause problems you may not anticipate.

    Resolution is wonderful

    I love extreme resolution. I’m not a fanatic about it, but I really appreciate it. I have not gone to 100+ MPixel sensors yet and I don’t normally do very large panoramas. Still, I get a thrill when I zoom in to 1-to-1 and see the great detail that is there. Then when I sharpen or contrast it more and the detail pops – wow!

    Having large resolution allows me to create large prints. It is a necessary thing since I do this for a living. It is also something I really like to do. I don’t think an image is complete until it is printed. For me, a print is the physical expression of the image.

    All things being equal, which they seldom are, higher resolution usually leads to sharper images. I love certain images to be “crunchy” sharp with great detail. It is part of my values that I can’t get away from.

    Also, larger files allow for more cropping freedom. I try not to rely on this. It is much better to compose the image the way I want it at capture time. But sometimes it cannot be avoided. Maybe the image works better in a square format, or maybe I’m only carrying a lens that goes to 70mm and I want to shoot something I can’t get close enough to. In that case I have to “zoom” in post processing by cropping the image.

    Or maybe I realize later that the real interest is in a smaller part of the frame. I have to crop the image heavily to salvage it. It’s not good practice, but I admit to doing it on occasion.

    For me, a great print from a well executed, high resolution file is a joy.

    Resolution is a pain

    On the other hand, high resolution can be a pain. It increases the cost and time of all the downstream stages.

    Every time I press the shutter it drops around 60 MBytes on my memory card. That is just the raw capture. It requires CFExpress or XQD cards to keep up. They are very expensive.

    As long as I can process the image in Lightroom the size stays around this, but when I step into Photoshop each image balloons to several hundred mega bytes. And that is even without adding a bunch of layers.

    Did you know that a Photoshop psd file (the native Photoshop format) cannot exceed 2 GBytes? Or that a tiff file cannot exceed 4 GBytes? I have found this out the hard way. Some of my images now have to be stored as psb files, the large file format version of Photoshop’s data.

    Processing and editing time goes up with pixels. I use a powerful computer with 64G RAM and very fast Thunderbolt3 disks, but it can take seconds to do a simple stroke when I am masking or burning or dodging. I have seen multi GByte files containing one or more embedded smart objects take 2 minutes just to save to disk.

    And you have to get to know disks in multiples of Terabytes. If you have a disciplined backup strategy, something I am fanatical about, then there are layers and layers of them.

    I have bought in to the need of powerful and expensive equipment for editing and storing my images. The biggest problem, though, is the slow editing speed. This interrupts the flow of my mental process. I don’t like waiting on the computer.

    Technique

    One of the unfortunate truths they seldom tell you when you are looking at a shiny new high resolution camera is that it is harder to take good pictures with it. This is partially because of the geometries you are dealing with.

    A full frame sensor, by convention, is 36 x 24 mm. My Nikon Z7 places 8256 x 5504 pixels in this space. That makes each pixel site 0.004 mm square. That is 4 microns from the center of one pixel to the center of the next. If you do not work in the world of integrated circuits or advanced physics you may have trouble conceiving these sizes. We do not directly encounter these dimensions in the real world.

    As an example, human hair ranges from 17 to 180 microns in diameter. Therefore the thinnest strand of hair you can possibly find would cover over 4 of these pixels. An average sized hair, around 50 microns in diameter, would cover a strip of at least 12 pixels wide across the sensor.

    A fun fact, but so what? The so what is that with each pixel being so small the problems of focusing and holding the camera steady are greatly compounded. Focus is critical and you almost have to rely on the very sophisticated focus system in your camera. Especially if it is contrast detection – meaning that it is searching for the best contrast, hence sharpest focus, measured directly on the sensor pixels.

    And for the sharpest results, don’t even think of taking a picture without using a good tripod. I don’t know how steady you think you can hold something, but consider that for optimum sharpness the camera cannot move or shake as much as 0.004 mm while the shutter is open. I can’t do that, especially after coffee.

    You need new lenses

    Another sad truth is that to realize the full benefit of your high resolution sensor you need lenses designed to match it. Current lenses achieve resolutions significantly better than was the norm a few years ago.

    The requirements for lenses for these new sensors greatly exceed the standard required for film or, say 6 – 10 MPixel cameras from just a few years ago. I have tried older lenses on my Z7. The results might be usable for some things, but nowhere up to the quality of something like a Z 24-70 f/2.8 designed specifically for the Z series.

    So another cost and problem of trying to achieve very high resolution is that you need to use lenses that will achieve the quality you are seeking.

    Why have lots of Mega Pixels?

    With all those problems, why should you want to shoot high pixel images? Maybe you don’t. That is what I am leading to here.

    Your gear should be chosen based on your intended use. These days many people will only post images on social media or put together a slide show of a trip or event. If they print at all it will probably be 8.5×11 inches (about A4 for you in the rest of the world). Quite honestly, a good 6 MPixel camera is all you would need for any of these things. Almost any mobile phone is great, except for the lack of lens choices.

    I have images from a 6 MPixel camera in my portfolio.They are good files and the quality of the pixels is good. I just would not try to print them very large.

    About the only thing that requires huge files is making large prints. This is a world I live in, but if you don’t then why bring these other problems on yourself? A good 12-16 MPixel camera is probably more than adequate for most people. They are smaller and lighter and cheaper. It is easier to take good pictures with them, it is easier to process them if you want to, and they require far less disk space. You can probably keep most of the images you want in online storage.

    But human nature being what it is, we can’t discount the lust factor. Pixel lust. Just like I know people who do some woodworking and have a workshop outfitted with an array of near commercial quality equipment. An expensive overkill, but if they have the space and money to burn, why not? You might need it someday.

    If you want to be logical and save some money and time, resist the lust for lots of mega pixels. You won’t need them.

    Its an OK problem to have

    Some of us are convinced we need them. Some of us just want the biggest and best. Many are just caught up in the hype of shiny new products.

    If you are going to have a high mega pixel camera, be aware going in of the costs and problems. But if you “need” it, go for it! The results are marvelous if you use the tools well.

    I love the results I get so much that I forget about the size and processing problems. I love the results so much that I gladly learn the required techniques to achieve them. They make all of my images better.

    Cameras and gear have advanced to the point where many of us cannot achieve the maximum they are capable of. But that is an astounding problem to have. What an embarrassment of riches! If we are the weak link in the process, we can learn and improve. We get better and our results get better.

    It’s a great time to be a photographer.

    What have your experiences been with high resolution photography? Let me know!